Oh my goodness!! I cannot believe how much time has past since I last posted! I often get asked if I'm going to ever post again. A few reasons I haven't....I had a baby girl, we've moved & lastly - my little girlie chopped her hair off to an A-line last year & since she's been in school all day - it's hard to get around to it. But I am going to try here & there again. I often get asked if I'll post short hair dos - so I will try my best. Thanks for all the support & nice emails out there. Believe me - I have read every single one - even if I haven't responded. Time has just slipped through my hands & I've loved just enjoying my little kids while they are little. I'm not sure how often I will post - but come back & check!
Jess
April 19, 2012
December 20, 2010
triple inside-out frenchbraids
We hope everyone is enjoying the holidays as much as we are. It sure is keeping us busy. & I told you in my last post my camera broke. Well - the next week we went to Disneyland & I couldn't even find it ANYWHERE!! I've been using my mother inlaws for a few days & had to sneak a post while I had a camera.
 Starts by sectioning off the front part of the hair & frenchbraiding it.
 I skipped the middle part & sectioned the underneath part first.
 Then I frenchbraided that the same direction as the top.
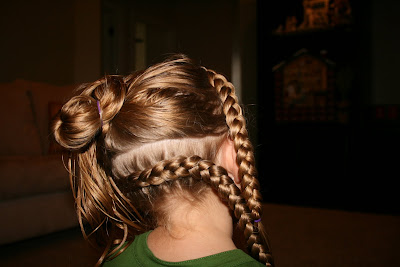 Now do the middle section, braiding the opposite direction & adding an elastic to where you want your pony tail to be.
 The tricky part is getting these dang pony tails even with each other. Mine are a little off (& they will be lopsided since one has more hair than the other)
 I braided each pony tail.
 Pulled it up half way & secured with an elastic
 Then folded that braid in half again & secured with an elastic. These are our favorite type of buns to do right now since her hair is so long.
 add your ribbons & you are done. Which by the way - we hardly wear bows anymore - she's all about ribbons which I'm find with - they stay in her hair better & look just as cute

November 18, 2010
Last month, my camera broke & I am unable to look thru the screen to see what I'm taking a picture of. I'm glad it still takes pictures!! This is super simple & it would be fun to do on 2 half up piggies also.
 Start with 2 basic pig tails
 Take a section from one side & braid it & secure to the other piggy with an elastic
 Then take another (smaller than the braid) section from the opposite the braid is in
 Twist the section so it is easier to wrap over the braid. Begin wrapping evenly until you get to the other side
 Secure with an elastic on the opposite pony. Then we finished the ponies with messy buns
 We are loving ribbon because we're not losing pairs like with the clips. But when I do messy buns - I do not love the look of wrapping a ribbon around the bun - it can look silly sometimes. So if you tie your bow then slide a bobby pin right in the middle - you then just push the bobby pin into the hair where you want placed.

 Here's the front view - by the time I tried taking a couple of the back view - my camera had had it & I think the battery died (can't tell since the screen doesn't work:) Scroll back to the top of this post to see the back again!

 Start with 2 basic pig tails
 Take a section from one side & braid it & secure to the other piggy with an elastic
 Then take another (smaller than the braid) section from the opposite the braid is in
 Twist the section so it is easier to wrap over the braid. Begin wrapping evenly until you get to the other side
 Secure with an elastic on the opposite pony. Then we finished the ponies with messy buns
 We are loving ribbon because we're not losing pairs like with the clips. But when I do messy buns - I do not love the look of wrapping a ribbon around the bun - it can look silly sometimes. So if you tie your bow then slide a bobby pin right in the middle - you then just push the bobby pin into the hair where you want placed.
 Here's the front view - by the time I tried taking a couple of the back view - my camera had had it & I think the battery died (can't tell since the screen doesn't work:) Scroll back to the top of this post to see the back again!
November 11, 2010
Shutterfly Christmas/Holiday Cards
I know this has nothing to do with hair but I am so excited for Christmas this year! & I've already started thinking about Christmas Cards. I'm totally digging the bright colors this year. I plan on using a black & white photo with the bright colors, it just seems to make the words POP out. I always DS my own cards but this year, Shutterfly is giving 50 free Holiday cards to bloggers. That is an awesome deal! Especially if you are planning on getting cards, why not get them free? & it's super easy - you just have to upload your own photo. Much easier {& quicker} than having to come up with a design on your own (like when you DS them). Honestly, I've never used Shutterfly before but my sisters are often printing through them. They have done both books & CALENDARS & they all look really nice. So you don't only have to get cards from them. These are a couple of my favorite: I am totally digging the red & turquoise together! So fun!


& there's tons more. If you go HERE you can see what other Christmas cards they have. If you're want more HOLIDAY CARDS, they have those too.
They also have lots of other cute ideas, like Christmas labels. Go HERE to check them out. Isn't that such a fun idea? Check their website out, there's tons of fun Christmas gift ideas. But you can use them all year long, for any occassion!
If you too want to get in on Shutterfly's craze & get 50 free holiday/christmas cards go HERE to sign up
October 26, 2010
messy bun...for the longer & thicker hair
I've had people ask how to do their girlie's hair in a messy bun once it gets so long & thick. Honestly - I'm not lovin' messy buns with my girlie's hair lately. Her hair is too long for them but time's come a calling when we are in a rush & they still are the fastest thing for me to do. This is a good example - normally - I don't like to do messy buns on one pony tail - it's just way too heavy...she'll even tell me her head is heavy on those days:) So if I do it in 2 pigtails - they usually look nicer & aren't quite so heavy.
So here you have your pony tail you want to make into a messy bun.
 Pull it up 1/2 thru & secure with elastic
 This is the secret right here: do the exact same thing as that first step. Fold the hair in half again & secure with elastic.
 Then depending on the look I'm going for, I will add bobby pins to give it a more messy look - or use rubber bands & do the messy look I've always done. It's that second step that is helpful for those with longer hair.
 Here's a front view
 Hope that helps. There are some other ways that I also do that I will post later.
 October 12, 2010
my last variation on the rolled braided flower
Who doesn't love wearing these darling rolled flower headbands? {which are super easy to make btw - if you're ever wanting to learn just google them & step by step instructions will show up} This is my last post on the rolled braided flower for hair - for those of you who are sick of seeing this flower!! I've been meaning to post this forever - & I'm really excited to. There are so many ways you can wear the rolled braided flower & this is just another fun way. Also - for those of you whose girls don't like keeping the headbands in all day, {ahem} mine, this is a perfect way to do a foe head band
 Do the rolled braid just like we've done in the previous post {if you haven't seen it - scroll down to get instructions - it's just a few posts before this} I then did another smaller one next to it, doing the exact same thing. For the third one, I just did it smaller, between the already there flowers. I tried to overlap it as much as possible over the 2 flowers to make it look close together & it looks better. **When I say smaller - I mean make the braid smaller - not quite as thick.
 The finished look. We kept the rest of the hair down. It turned out super cute & was really fun. People actually noticed that it looked like the flower headbands!!

September 20, 2010
Double Rope Braids
My girlie's hair is just getting oh so long! I can't get her to cut it. I think she would look darling in a bob but she loves her long locks too much so we opted for layers, or "lazers", as she call them. She went up to our hair dresser & said will you cut Lazers in my hair? He looked at me like what???? Layers. They are long layers so it gives enough texture that when we curl it - it holds better & looks better. Also, because they are longer, when we braid or pull her hair up - the layers aren't sticking out with every braid.
So here's our new post:
 Start by dividing the hair in half horizontally. Clip the top part up.
 Begin to TWIST braid the hair. Unfortunately, I cannot find the tutorial that I have put up here on how to do this twist - so looks like there will be one coming soon. If you haven't learned this twist braid - you will love it - it seems to be a constant in our home.
 Next, twist the top section - bringing the 2 together to make a side pony
 I pulled the pony 1/2 thru an elastic. This left a good way for me to do a messy bun. I then pinned in to let the bun take it's shape how I wanted it.
 I then curled the ends that were left hanging
 & you're finished!!

front/top view

So here's our new post:
 Start by dividing the hair in half horizontally. Clip the top part up.
 Begin to TWIST braid the hair. Unfortunately, I cannot find the tutorial that I have put up here on how to do this twist - so looks like there will be one coming soon. If you haven't learned this twist braid - you will love it - it seems to be a constant in our home.
 Next, twist the top section - bringing the 2 together to make a side pony
 I pulled the pony 1/2 thru an elastic. This left a good way for me to do a messy bun. I then pinned in to let the bun take it's shape how I wanted it.
 I then curled the ends that were left hanging
 & you're finished!!
front/top view

September 1, 2010
Remember how I told you I had another variation of the rolled flower? I'm finally getting around to posting it. I have one more idea that I want to show you with the rolled flowers so stay tuned for that also.
I love this because it replaces a bow & stays in better than a bow would which is super for this little girlie going to school & losing bows left & right.
 Get a nice tight side pony. Then braid just one section on the top of pony & secure with elastic
 Just like the previous post, began twisting the braid - keeping it flat & securing with bobby pins as you go along. If you can't remember - check the post out below
 & you're finished!! I curled the pony but do what you want

 side/front view

I love this because it replaces a bow & stays in better than a bow would which is super for this little girlie going to school & losing bows left & right.
 Get a nice tight side pony. Then braid just one section on the top of pony & secure with elastic
 Just like the previous post, began twisting the braid - keeping it flat & securing with bobby pins as you go along. If you can't remember - check the post out below
 & you're finished!! I curled the pony but do what you want
 side/front view
August 21, 2010
Rolled Braided Flower
This little girlie has started kindergarten!! We are thrilled & she's lovin' it!! Who knows where we've been - we've just let time slip past us. But I'm still around - posting:)
My sister is fabulous & she actually came up with this idea - I had to ask if I could put it on here it's so genius. You know those darling flowers made out of material - that are rolled & are just so cute? Well - she thought it would be fun to try it on hair. I am in love with it & we've done it a few times since. It is one of those that YOU can do on yourself, on your girlie or even a teenager could wear. Don't we love those? I'm just sad that my hair's too short do fun things like this anymore.
CHECK back because I'm going to post another variation of this darling rolled braided flower
 It starts out really easy & simple. Just pull a section of hair back & braid it. I wanted the braid back a little bit - so it didn't sit right on top of her head or too close to her forehead so just bring as far back as you would like. Secure end of braid with an elastic leaving no more than 2" at the bottom
 Start by twisting the hair, but keep that braid flat to the head. After about each roll or twist - I secured it with a bobby pin
 Try to hide that bobby pin as it's going in.
 Keep rolling & keep that flower as flat to the head as you do so - continuing to secure with bobby pins.
 When you get near the end start to twist the unbraided section & hide it under the flower & secure with bobby pin.
 finished flower:
 side view of flower
 We left her hair down - but you could pull it up or do 3 flowers in a row - like those headbands. so cute!!
Subscribe to:
Posts (Atom)